One of the critical applications of optical metrology in tooling is the dimensional characterization of cutting tools to ensure they perform optimally and have a long service life. Roughness measurements can also be used to predict how removed material will exit the tool in the aim of preventing clot formation or overheating. In addition, optical metrology can provide local measurements to help identify issues such as chipping or coating peeling, which indicate if a tool needs to be replaced or repaired. In the following study, all these characterizations, which come in very different orders of magnitude, were managed using one, unique set-up: the Sensofar S neox Five Axis and SensoMap software.
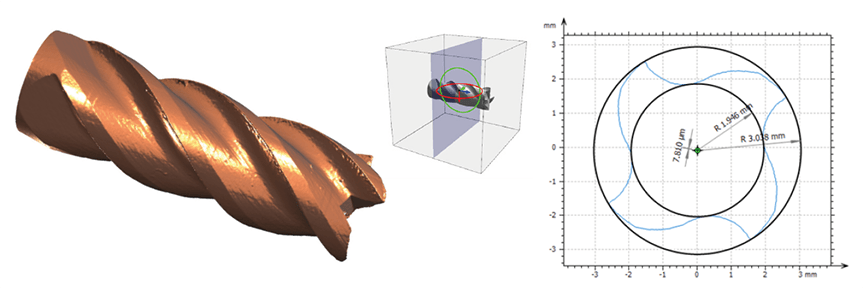
Above. 3D visualization of the cutting tool with extracted cross section to determine consistent diameter and concentricity.
3D shape acquisition & analysis
The S neox Five Axis system features a rotational module, which allows for the complete measurement of sample shape. This is particularly useful in the tooling industry, where precise measurements of cutting tool geometries are critical to achieving optimal performance.
The system offers three technologies: Confocal, Interferometry and Active Illumination Focus Variation (AiFV), allowing measurement of roughness, cutting edge, shape of tools and micro-tools. In this particular case, AiFV is the preferred choice due to its fast measurement speeds and superior ability to measure slopes.
After acquiring the necessary data, we analyzed the mesh data comprehensively. This is where SensoMap software proves extremely useful, particularly its Shell Module, which allows users to extract dimensional and roughness information by navigating from mesh to topographical data and then to profile data.
Dimensional analysis
Several measurements were performed using parametric profiles generated from shell data to comprehensively understand the end mill geometry. Firstly, cross sections were extracted perpendicular to the cutting axis of the end mill at multiple locations along the flute length to determine whether the tool maintained consistent external diameter. Additionally, we calculated the concentricity between the inner and outer circles to check for any tool run-out.
Another measurement allowed us to examine the pitch of the helix. To achieve this, we fitted the tool to a cylinder and unrolled it. Next, we extracted a profile perpendicular to the helix angle and measured pitch distance. By using advanced measurement techniques and software, such as those employed in this analysis, manufacturers can optimize their processes, reduce costs, and improve product quality, ultimately contributing to better business and customer outcomes.
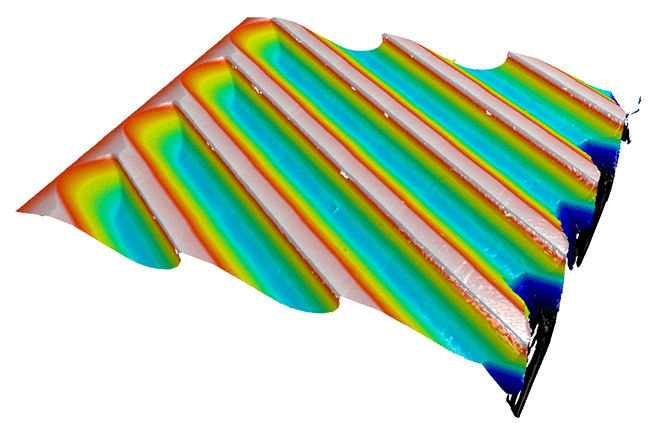
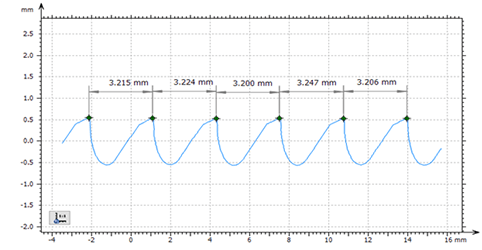
Above. “Unrolled” cylinder (left) and pitch distance measurements (right).
Roughness analysis
A profile was extracted from the previously unrolled cylinder and roughness parameters according to ISO 4278 were calculated. We were thus able to ensure a clean surface finish on edges rather than a rough one, which can negatively impact the quality and performance of the tool.
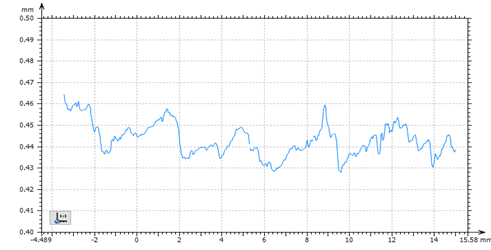
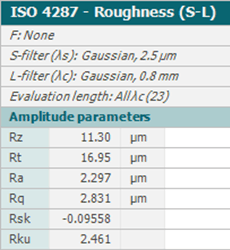
Above. Roughness calculations.
Peeling assessment
One of the most important features of cutting tools is their coating, which significantly impacts their durability and ability to withstand high-stress processes. The SensoMap Shell Module was used to evaluate peeling through extraction of topographies from the mesh. Then, using the Particle Analysis tool, we were able to focus on the areas where peeling occurred and determine the extent of damage. This allowed us to understand peeling area dimensions thus aiding investigation into whether it was limited to the coating or if some material was missing due to chipping.
By identifying the extent of coating peeling and chipping, appropriate action can be taken to ensure that the tool remains in optimal condition and performs to its fullest potential.
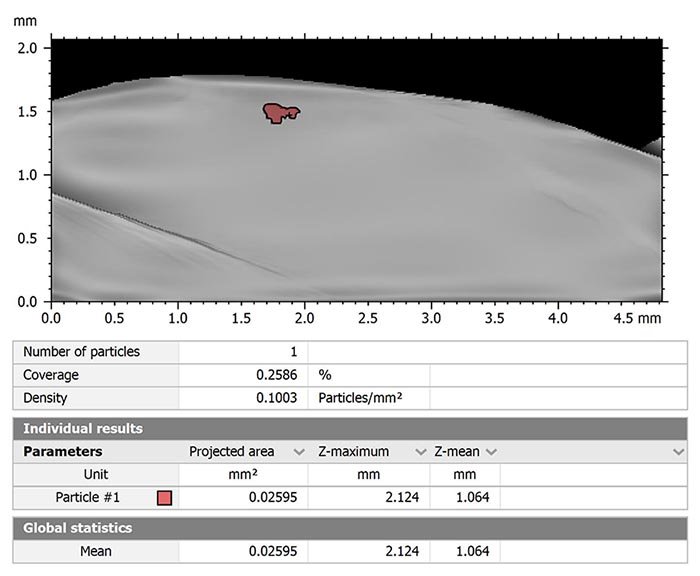
Above. Evaluation of peeling using Particle Analysis.
Conclusion
The combination of SensoMap software and the S neox Five Axis made it possible to characterize end mill dimensions, roughness and peeling defects. With this innovative technology, manufacturers can achieve unprecedented levels of precision and accuracy, making it possible to produce high-quality products that meet the demands of today’s market.
Instruments & software used
Senosofar S neox Five Axis system & SensoMap software powered by Mountains®
See also: www.sensofar.com/metrology/industry-research/sneox-fiveaxis/